Wednesday, April 29, 2015
Friday, May 9, 2014
Foreground Interest


A focal length between 16mm – 24mm is best with an aperture setting of f/22. If your shutter speed gets too slow to avoid camera shake, increase your ISO or better yet, use a tripod. Put your focus on manual and set it to 3 feet. Now you just need to frame up your image. You will have to get within a foot or so of your foreground item and don’t worry if some areas of your image do not appear to be in focus when viewed through the view finder. The resulting image will be tack sharp from front to back.
Look for items like flowers or foliage
to add color and detail. Foreground
interest does not have to be at the bottom of your image either. Try putting it
off to one side or along the top of your picture for a different look. This simple technique will take your
landscape photos from good to great in a snap.

Wednesday, November 6, 2013
Outdoor Flash Techniques
Flash and High Speed Sync
I have had Canon Speedlite flash for a couple of years now
but since I am primarily a wildlife and landscape photographer, I’ve rarely
needed a flash. But, recently I have
been watching a number of very good flash tutorials on YouTube and I’ve been
inspired. What has intrigued me most is
how the ambient light can be controlled with shutter speed and dark moody
images can be shot in full daylight. Last
weekend my fiancé and I had the opportunity to spend a few days at a cabin in
the country. He would be spending his
time hunting deer which would leave me hours on my own to practice some of the
techniques I’ve been learning about.
Using a flash is simple but, like anything else, takes some practice. The key to this technique is to put your flash
on high speed sync which allows you to increase the shutter speed on your
camera.
 |
| orbis® Ring Flash Set up with flowers |
 |
| Final image of flowers |
I had to adjust my shutter speed up to 1/800th of
a second before I saw any real change in the ambient light. Next I tried a shutter speed of 1/1250th
and finally at 1/2000th of a second the background became nice and dark. I had to move the orbis® and flash
numerous times. If the flash was too
close, the light appeared harsh even with the orbis® diffuser. If it was too far away, the flowers did not get
properly lit up. It took about 5
attempts before I got the effect I wanted.
A little tweaking in Lightroom to bring out the highlights resulted in a
nice final image
 |
| Set up for bottle image - note the flash in the tree! |
My next subject was a series of empty glass jars I found lying next to an old dilapidated cottage that was in a field nearby. I picked up the jars and lined them up on a window sill. I didn’t use the orbis® ring flash this time because I needed more direct light and anyway, I couldn’t figure out how to balance it and the flash in the adjacent tree I was pressing into use as an assistant. I used a plastic diffuser cap on the flash instead. It had become cloudy by this time and I found that I only needed to push my shutter speed to 1/320th of a second to get a dramatic look. Using Lightroom, I boosted the contrast and highlights and added some clarity and sharpening to get the theatrical end result.
 |
| Final image of jars on the window sill |
 |
| Image straight out of the camera |
My third practice session was with my fiancé Michael. After hunting for hours and eating a big
lunch, he was more than happy to sit in a comfy Adirondack chair by the lake
and let me practice on him. Once again I
fitted the Speedlite with the orbis® ring flash.
It does a beautiful job with portraits.
I set up the flash about 12 inches from the side of his face. He hadn't shaved in a couple of days and I
wanted to capture the texture of his scraggle.
I had to keep asking him to stop smiling since I wanted to capture the
fierceness of his hunter persona. The
sun started peeking out from the clouds at this point so it became decidedly
more difficult to control the ambient light.
After waiting for a passing cloud, I ended up using a shutter speed of
1/800th of a second to capture a soft but moody portrait of
Michael. The striking final portrait was
achieved in post processing by increasing the shadows and highlights to create
a high contrast image that accentuates the texture and lines of the face.
 |
| Boosted contrast produced this dramatic portrait |
I’m very happy with my efforts and can’t wait to practice on
other types of subjects. If you want to try this yourself, I recommend you
watch some of the videos on YouTube produced by Adorama TV and B&H Photo.
The equipment I used that made these images possible are:
Canon Speedlite 430ex flash
Joby Gorilla tripod
Vello shutter trigger cord
orbis® Ring
Flash by Enlight Photo
ioShutter™ cable
release and ioShutterPro iPhone app by Enlight Photo
The orbis and
ioShutter can be ordered at: http://usstore.enlightphotopro.com/
Use the code: beachftw to get a 10% discount and free shipping. (expires 04/30/14)
Coming up next: ioShutter™ vs. Trigger Trap: A review and comparison of these two smartphone controlled camera trigger devices.
Visit my website at
www.beachcottagephotography.com
Monday, June 17, 2013
Orbis® and Frio®: A review
OK. I know that I usually take outdoor nature photos but sometimes I like to play with some creative indoor photography techniques. Recently Enlight Photo sent me a couple products to try out. I had a photo exhibit to prepare for and
classes to teach so I didn’t have a spare minute to try them out until the last
few days. What a fun few days I have
had.
 |
| Frio® attaches flash to tripod |
The first item I used was the frioTM cold shoe. This handy
gadget allows you to attach your flash to any tripod or any stand with a standard
1/4-20 thread. I used it to mount my
flash on my little Joby tripod which I positioned to light the underside of a
glass dish that contained oil and water.
This classic macro technique produces wonderful abstract images. I really loved the ease and simplicity of the frioTM.
It is small and light and allowed me to place my flash exactly where I needed
it for the job.
 |
| Oil & Water Study |
Enlight Photo’s signature product is the
orbis®, an accessory that turns your detachable SLR
flash into a ring flash. At first glance the orbis®
, seemed a bit bulky compared to the compact macro ring flashes I'm used to but, I soon found that to be a good thing. Its
size allows it to diffuse light beautifully, eliminating ugly, harsh shadows. It
simply fits over your flash gun allowing for TTL operation of your flash.
 |
| Orbis® set up |
Along with
it, they included the orbis® arm which attaches to the tripod mount on the
bottom of your camera and holds the flash and orbis® in
place around your lens. I found that the arm added unnecessary weight and bulk
to the whole setup. In fact it was
difficult for me to hold the camera up with one hand with the flash, arm and orbis® attached for more than a minute or two at a time. To be fair, I was
starting out with a Canon 5D MKII with a 70-300mm lens attached. Combined they weigh almost 4 pounds and I am
a petite female. Once I removed the arm, the problem was solved and I could
easily hold the unit in my right hand while I adjusted focus and such with my
left. While the orbis® is designed to be used with support for the flash, it held my flash tightly enough so it could
hang down from the bottom when I needed to let go for a moment to make adjustments with my left hand. The arm or hand held support would be
necessary for larger, heavier flash units. The weight was not a problem when I mounted the unit on a tripod.
 |
| Birds Nest |
For some
time I have been wanting to photograph a bird’s nest I found last winter so I
decided to use it as the subject for my first test of the orbis® I set up my ‘stage’ by placing a black hinged
science board on a black tablecloth. I mounted my camera on my tripod and
linked the flash to the camera with a flash cord. It took me a few tries with various adjustments
to the flash strength to get some great images.
I am very pleased with the soft light produced by the orbis® and
that I was able to achieve the look I wanted by isolating my subject from the
background. At half the price of an electronic ring flash, the orbis® is a
great product and a fantastic money saver. And, while this test was done indoors, I plan to take both the frioTM and the orbis® outdoors next so, stay tuned...
Get 10% off plus free shipping by using the
coupon code: beachftw
For more
information on the Orbis® and other great products from Enlight Photo
visit: http://enlightphotopro.com/
For more
examples of photograph by Barbara Marie Kraus visit: http://BeachCottagePhotography.com/
Images taken using the Orbis® and frioTM
 |
| Raccoon Skull |
 |
| Shore bird Skull |
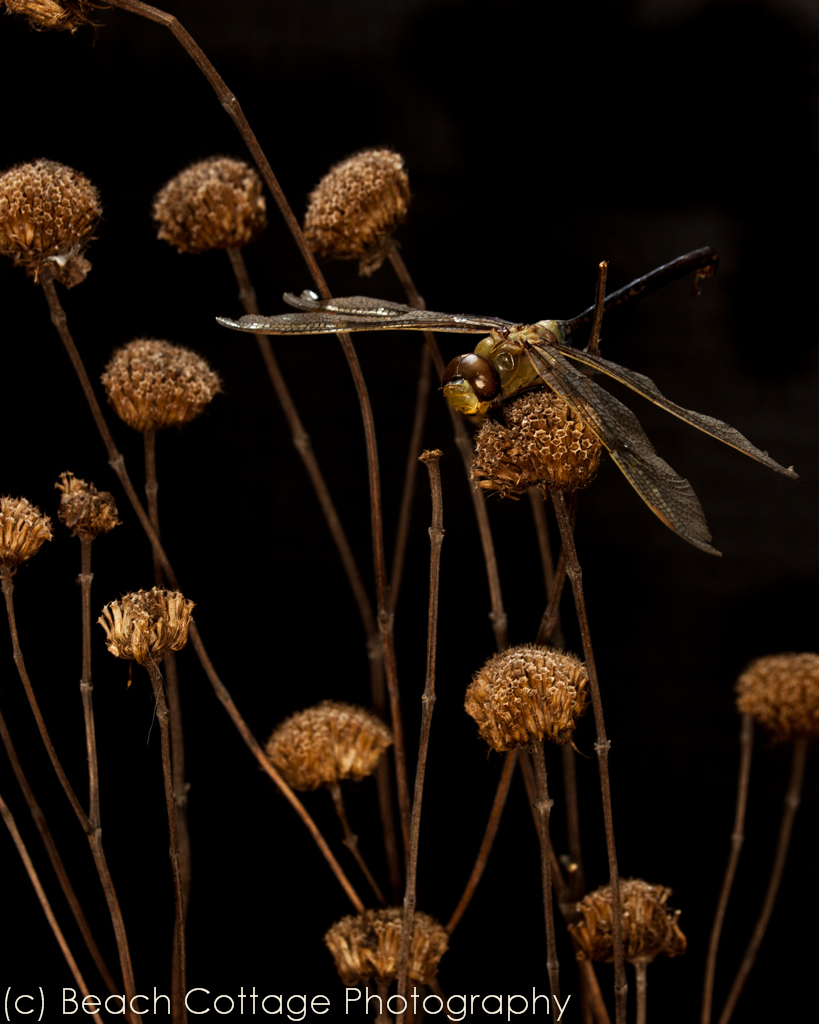 |
| Preserved Dragonfly on dried flowers |

Oil & Water Study II
Friday, May 31, 2013
Sunrise, Sunset
Golden Isles, Golden Images
Destinations for Photographers
by Barbara Marie Kraus
.jpg) Sunsets and sunrises have
long been a popular subject for photographers.
The most interesting images are those that have some foreground interest
or a silhouette. A good silhouette has
some detail and a recognizable shape. Excellent
choices for silhouettes are boats, piers, trees or people.
Sunsets and sunrises have
long been a popular subject for photographers.
The most interesting images are those that have some foreground interest
or a silhouette. A good silhouette has
some detail and a recognizable shape. Excellent
choices for silhouettes are boats, piers, trees or people.
Composition is the key to a great picture. The focal
point of your image will be determined by where you place your horizon. Never put the horizon across the middle of
the image. Instead decide what part of the scene is more interesting. If the clouds are creating dramatic patterns,
put the horizon line 1/3 up from the bottom to maximize the sky. If reflections in water or a detailed
foreground are more interesting than the sky, place the horizon line 1/3 from
the top. Try placing the sun 1/3 to the
left or the right too. It’s also important
to make sure your horizon is straight.
You don’t want your pier, tree or person to look like they are sliding
out of the scene. Try using different
focal lengths; wide angle shots create sweeping landscapes while zooming in
will make the sun look larger. Remember,
it can be dangerous to look straight at the sun while zooming so, be careful.
Be prepared and scout out a
good location well in advance. Once the sun gets close to the horizon it moves
quickly so you don’t want to be racing around looking for a good vantage point.
You will probably need to take your camera off the Auto
setting if you want to capture the beautiful saturated colors in sunrises and
sunsets. Switch the mode dial to
"M" and adjust the aperture setting to f/5.6 and your ISO to100 or
200. Adjust the shutter speed until the previewed sunset image looks dark,
highlighting the sunset and turning other subjects in the foreground or
background into silhouettes. If you have
a point and shoot camera, check to see if it has a Sunset Scene setting.
 Don’t arrive too late or leave too early. The most dramatic sunrises occur before the
sun has crested the horizon. For
sunsets, ten to twenty minutes after the sun sets is a great time to capture deep
and intense colors.
Don’t arrive too late or leave too early. The most dramatic sunrises occur before the
sun has crested the horizon. For
sunsets, ten to twenty minutes after the sun sets is a great time to capture deep
and intense colors.
One of the most popular locations in the Golden Isles to
capture beautiful sunrise images is Driftwood Beach on Jekyll Island. Giant driftwood trees create stunning
silhouettes against the sun rising up from the ocean. Get there at least 30 minutes before sunrise
for the best results. If you like pier silhouettes,
sunset images taken from the St. Simons village area and Clam Creek on Jekyll
Island both provide dramatic vistas.
Each Wednesday night this
summer from June 26 – July 31you can join Barbara Marie Kraus at the St. Simons
pier for a hands-on Photographing Sunsets
workshop. Contact Glynn Art
Association for more info at 912-638-8770 or visit www.glynnart.org.
For information on outdoor photo workshops at Harris Neck Wildlife refuge or private lessons visit www.BeachCottagePhotography.com or call 912-996-0170
Tuesday, March 26, 2013
Photographing Birds in the Golden Isles
April 2013
Largely undeveloped, Jekyll Island offers some of the best locations for capturing photos of area birds. The number and type of birds found at these locations will vary with the tides and the time of day so get ready to visit each spot multiple times:
· The observation platform at the St. Andrews Picnic area on the south end looks out over a tidal creek and marsh area where wading birds, like herons, egrets and wood storks are often found feeding.
· Walking along St. Andrews beach to the east will bring you to the southern tip of the island where seabirds of all types, including flocks of pelicans, can be seen resting at the water’s edge at low tide. Other birds commonly seen dashing in and out of the edge of the surf at high tide are plovers, sandpipers, clappers and oystercatchers. Gannets and cormorants can often be spotted skimming above the waves or diving for fish not too far from shore.
· Adjacent to the historic district, the pond behind the old amphitheater serves as a small rookery and is a perfect place to shoot images of nesting storks and egrets with chicks in the late spring.
· The Visitors Center along the Jekyll Island causeway has a 25 foot tall observation tower that looks out over the Marshes of Glynn. It’s hard to make the drive across the marsh without seeing the dark shapes of osprey and hawks crisscrossing the roadway.
· The west side of Highway 17 just south of the Sidney Lanier Bridge is a favorite feeding spot at high tide in the summer, for the colorful Roseate Spoonbill.
Almost any dock, pond or marsh area can be a potential spot to take a good bird photo so carry your camera with you as you visit different areas. You may be lucky enough to capture that award winning photo right here in the Golden Isles of Georgia.
Golden Isles, Golden Images
Destinations for Photographers
by Barbara Marie Kraus
Destinations for Photographers
by Barbara Marie Kraus
 |
| Mating Egrets |
One thing any visitor to the area
will quickly realize is that we have birds - lots of birds. The rivers, marshes and ocean provide habitat
for more than 300 species. Some species
live here year round while others are just passing through as they migrate. Commonly seen birds that make the Golden Isles
their permanent home include wood storks, egrets and herons, pelicans, osprey,
terns, rails, gulls, sparrows, painted buntings and a variety of other song
birds. The key to interesting bird
photos is getting close. Any image where
the subject fills the frame is going to have more impact and since birds are
skittish, a telephoto or zoom lens is a must.
 |
| Red Shouldered Hawk |
Largely undeveloped, Jekyll Island offers some of the best locations for capturing photos of area birds. The number and type of birds found at these locations will vary with the tides and the time of day so get ready to visit each spot multiple times:
· The observation platform at the St. Andrews Picnic area on the south end looks out over a tidal creek and marsh area where wading birds, like herons, egrets and wood storks are often found feeding.
· Walking along St. Andrews beach to the east will bring you to the southern tip of the island where seabirds of all types, including flocks of pelicans, can be seen resting at the water’s edge at low tide. Other birds commonly seen dashing in and out of the edge of the surf at high tide are plovers, sandpipers, clappers and oystercatchers. Gannets and cormorants can often be spotted skimming above the waves or diving for fish not too far from shore.
· Adjacent to the historic district, the pond behind the old amphitheater serves as a small rookery and is a perfect place to shoot images of nesting storks and egrets with chicks in the late spring.
· The Visitors Center along the Jekyll Island causeway has a 25 foot tall observation tower that looks out over the Marshes of Glynn. It’s hard to make the drive across the marsh without seeing the dark shapes of osprey and hawks crisscrossing the roadway.
· The west side of Highway 17 just south of the Sidney Lanier Bridge is a favorite feeding spot at high tide in the summer, for the colorful Roseate Spoonbill.
 |
| Brown Pelican |
 |
| Wood stork |
Almost any dock, pond or marsh area can be a potential spot to take a good bird photo so carry your camera with you as you visit different areas. You may be lucky enough to capture that award winning photo right here in the Golden Isles of Georgia.
Thursday, January 17, 2013
Winter Adventures on the Appalachian Trail
Written by Barbara Marie
Kraus
Photography by Barbara Marie
Kraus

Winter hiking and
camping are not for everyone - we realize that.
We often get asked why we would want to trudge through an empty leafless
forest just to spend the night in a tent on a mountain in the dead of winter. While
most people would rather sleep in a warm cozy bed, we like being bundled
tightly into our down mummy bags with only a thin piece of nylon between us and
the elements. To us, laying and
listening to the random rhythm of raindrops and the heave and hoe of wind
howling through the trees is to listen to the music of the land and the breath
of the earth. It settles our souls, and
soothes away the anxiety and stress brought on by the din of modern life. These
raw, outdoor adventures help us appreciate the ease and abundance we enjoy in
the Western world.
For
three days and two nights Michael, a life-long, experienced outdoors-man and
mountaineer and I, a professional photographer and occasional trekker, will
hike and camp along the Appalachian Trail in North Georgia over the New Year’s
weekend. We will carry everything we
need in packs on our backs and hike a total of twenty five miles. Our final destination is the Lodge at
Amacolola Falls where we will enjoy two nights of comfort and ease. The weatherman is calling for rain on our
first night camping and dry weather on the second with temperatures ranging
from lows in the high thirty’s to highs in the mid-forties. We are looking forward to relatively mild
weather and hope the forecast is accurate but conditions can change quickly in
the mountains so we are prepared.
 We have
just finished a big home-cooked breakfast at the Hiker Hostel north of Dahlonega,
GA. It’s about 10:30 am and a very
pleasant fifty three degrees as our shuttle driver, Patsy drops us off on the forest
service road at Justus Creek. She takes
our photo, and wishes us well as we load our packs up onto our backs and head
off along the creek on an old hunting path that Michael remembers from years
ago. The small footbridge that once
crossed the creek is now gone and we have to carefully scoot along an icy log
to get to the other side. While the
creek is less than twelve inches deep, neither of us wants to start our hike
with wet feet. Within minutes we spot
the familiar white blaze that marks the Appalachian Trail. This section of the trail is beautifully
maintained with log steps set into the hill and large stones that make crossing
the creek easy. The climb south over
Justus Mountain is steep and gets our hearts quickly pounding.
We have
just finished a big home-cooked breakfast at the Hiker Hostel north of Dahlonega,
GA. It’s about 10:30 am and a very
pleasant fifty three degrees as our shuttle driver, Patsy drops us off on the forest
service road at Justus Creek. She takes
our photo, and wishes us well as we load our packs up onto our backs and head
off along the creek on an old hunting path that Michael remembers from years
ago. The small footbridge that once
crossed the creek is now gone and we have to carefully scoot along an icy log
to get to the other side. While the
creek is less than twelve inches deep, neither of us wants to start our hike
with wet feet. Within minutes we spot
the familiar white blaze that marks the Appalachian Trail. This section of the trail is beautifully
maintained with log steps set into the hill and large stones that make crossing
the creek easy. The climb south over
Justus Mountain is steep and gets our hearts quickly pounding. 
 The
sun is shining through drifting clouds and it is wonderfully tranquil hiking
through the stark winter forest. The leaflessness of the trees allows us to see
the rise and fall of the land which normally hides behind the forest foliage at
other times of year. Small pockets of old snow can be seen in the shaded
valleys and icicles hang off rocks. Along
the path, ice crystals have pushed up out of the ground which creates a wonderful
crunching sound as we step on them. In contrast to these wintery signs, lush
green moss clings to downed trees and blankets small areas of the forest floor.
I pause to take a photo of the primal forest scene and a bird can be heard in
the distance breaking the stillness. As we hike down the backside of Justus
Mountain to Cooper Gap. We stop to rest at
the forest service road that passes through the valley and are startled by
three mountain bikers who whiz past us in a blur, As we load up again, the whisper of a slight wind in the upper
reaches of the trees can be heard and the scattered clouds of earlier have
begun to thicken. After another steep climb we pause to rest along a ridge on
Sassafras Mountain. Through the trees, the North Georgia Appalachian Mountains
can be seen fading into the distance. Michael and I plan to thru hike the
Appalachian Trail one day and it is rather daunting to think that these rolling
hills, born millions of years ago are only a small part of that more than
twenty one hundred mile journey.
The
sun is shining through drifting clouds and it is wonderfully tranquil hiking
through the stark winter forest. The leaflessness of the trees allows us to see
the rise and fall of the land which normally hides behind the forest foliage at
other times of year. Small pockets of old snow can be seen in the shaded
valleys and icicles hang off rocks. Along
the path, ice crystals have pushed up out of the ground which creates a wonderful
crunching sound as we step on them. In contrast to these wintery signs, lush
green moss clings to downed trees and blankets small areas of the forest floor.
I pause to take a photo of the primal forest scene and a bird can be heard in
the distance breaking the stillness. As we hike down the backside of Justus
Mountain to Cooper Gap. We stop to rest at
the forest service road that passes through the valley and are startled by
three mountain bikers who whiz past us in a blur, As we load up again, the whisper of a slight wind in the upper
reaches of the trees can be heard and the scattered clouds of earlier have
begun to thicken. After another steep climb we pause to rest along a ridge on
Sassafras Mountain. Through the trees, the North Georgia Appalachian Mountains
can be seen fading into the distance. Michael and I plan to thru hike the
Appalachian Trail one day and it is rather daunting to think that these rolling
hills, born millions of years ago are only a small part of that more than
twenty one hundred mile journey. 
By
mid-afternoon the sky has started to darken and the temperature has dropped. We are expecting rain tonight but hope that we
will have time to set up camp, cook and eat before it starts. Around 4:30, we
see the Hawk Mountain shelter through the trees. To our delight the campers who
have already arrived are busy chopping and splitting downed limbs to make a
fire. This shelter has a loft in which a group of three young people from
Mobile, Alabama have set up their tent and settled in. The main floor of the
shelter has been claimed by a father and son team from Richmond Hill, Georgia who
are also busy setting up. We greet them and decide to pitch our tent about
forty feet from the shelter near the path to the privy. By the time we finish setting up, the groups
staying in the shelter have built an outstanding blaze in the fire pit. The temperature has continued to drop and it
will certainly be colder than forecasted by dark. Despite the cold, we enjoy exchanging hiking
stories and equipment reviews with our new friends while we cook dinner on our
tiny folding camp stove at the shelter picnic table. Tonight's fare is whole wheat couscous with
foil pouch chicken marsala. It tastes especially good after a day of hiking. By
now the sun has been down for almost an hour and everyone is starting to feel
the chill. We sit on logs placed around the fire pit while we eat, simultaneously
warming our feet and our bellies. Before long we feel the first rain drops. Luckily the clouds do nothing more than spit while
we finish eating and clean up. It's only 7:00pm when we bid the others good
night and head off to our tent. Just as we settle in the rain increases, and we
have no trouble falling asleep to the steady patter of drops on the fly of our tent.
 We
wake around 7:30 am. It’s warmer this morning but only slightly. The temperature
is still in the thirties. Unfortunately, there is no chance to building a fire
on this wet morning so we decide to linger in our down sleeping bags until
almost 8:30am before crawling out to greet the day. The rain has stopped but the
mountain is now enveloped by a thick mist which creates an eerie and hushed
landscape of darkened shapes and shadows. The campers in the shelter start to
stir as Michael fires up the stove to boil water. Soon we are enjoying hot
coffee and instant grits with homemade beef jerky. Hopefully it will give us the energy to deal
with any challenges we may face on today’s hike. We will continue south on the Appalachian
Trail towards Springer Mountain. Depending
upon how far we hike, we will have a choice of shelters that we can stay at. The weather forecast is for dry weather but
this moisture is looking persistent. While
rain is fine at night and we have waterproof clothing, hiking in the rain is
usually difficult and unpleasant. We
hope the sky clears soon.
We
wake around 7:30 am. It’s warmer this morning but only slightly. The temperature
is still in the thirties. Unfortunately, there is no chance to building a fire
on this wet morning so we decide to linger in our down sleeping bags until
almost 8:30am before crawling out to greet the day. The rain has stopped but the
mountain is now enveloped by a thick mist which creates an eerie and hushed
landscape of darkened shapes and shadows. The campers in the shelter start to
stir as Michael fires up the stove to boil water. Soon we are enjoying hot
coffee and instant grits with homemade beef jerky. Hopefully it will give us the energy to deal
with any challenges we may face on today’s hike. We will continue south on the Appalachian
Trail towards Springer Mountain. Depending
upon how far we hike, we will have a choice of shelters that we can stay at. The weather forecast is for dry weather but
this moisture is looking persistent. While
rain is fine at night and we have waterproof clothing, hiking in the rain is
usually difficult and unpleasant. We
hope the sky clears soon.
At
9:50 am we say good bye to the others and hit the trail again. The path is
still shrouded in a thick fog making the de-saturated landscape fade quickly away. Our already simplified existence is further
reduced to the trail and a few trees on either side like a scene in a plastic
snow globe. Around
lunch time, we reach another forest service road and make a short detour to
visit the historic Hickory Flats Cemetery. Most of the graves date from the early 1900's
and are indicated by only unmarked stones. We wander about looking at the
graves as we eat but soon get back on the trail. Rather than climbing as expected, the
thermometer continues to drop and to our surprise, tiny snowflakes start to
drift down through the bare branches of the trees. The snow is so fine it melts
away as it touches the ground. It is pretty to watch but we hope it will not
cause problems with our hike. Within an
hour we reach a side trail which takes us west to Long Creek Falls. This charming creek tumbles over a twenty
foot high rock face and then travels down a series of smaller terraces before
disappearing around a bend. I set my
camera on a large boulder and set the timer, racing to stand beside Michael
before the shutter clicks. It’s the perfect vacation photo op. As we turn to leave the falls, we meet up
with a hiking family who has parked at a forest service road about a mile away.
They are the third group of day hikers we have met on the trail so far today.

It
is now about noon and there is another noticeable change in the weather as we
stop for a snack at a wooden footbridge that crosses a stream. The snowflakes
have started to get larger and are starting to stick to the broader leaves of
the rhododendron bushes. It’s not long before the air is filled with fluffs of
white and I am reminded of my childhood
in Canada as I watch the floor of the forest is slowly turn white. We hike for more
than two hours watching the snow collect and enjoying the wintery sights. We
reach Stover Creek shelter but nobody has yet taken up residence and we press
on. To our dismay, we soon notice that
the snow is starting to change again. The fluffy white flakes have suddenly
become small and hard. Icy pellets sting
our unprotected faces and start to collect on the sides of branches and leaves
creating the illusion of razor sharp edges. As we begin our ascent of Springer
Mountain, the wind whips up even more, and by the time we reach the summit it
is bitterly cold and blowing hard. We make our way to the shelter and to our
surprise find that it already has a lodger.
A man whose trail name is ‘Catfish’ and who thru hiked the Appalachian
Trail in 2011 has decided to relive his hike with an overnight stay. It’s 3:00
pm and he is snuggled into his sleeping bag reading the shelter journal. We
stop to chat for a few minutes but have already decided to get out of the
severe wind of the summit and press on to the next shelter at Black Gap. As we
reach the plaque that marks the southern terminus of the Appalachian Trail we
are astonished to meet three hikers wearing shorts and carrying very light
gear. The temperature is well below
freezing with a wind chill in the teens but they seem unconcerned. Wishing them well, we press on down the other
side of Springer. The Appalachian Trail ends on Springer Mountain and we are
now on the Approach Trail which will lead us to our warm bed at the Amacolola
Falls Lodge tomorrow. With that in
mind, we press on.

The
next shelter is still a mile and a half away; the only way to stay warm is to
keep moving. The descent is steep in places and we are stiff with cold. We have to hike slowly and carefully. The wet conditions last night and the
plunging temperatures today have created pockets of ice on the trail. Our packs make us top heavy, making it
difficult for us to catch our balance if we slip. Thankfully by 4:30 pm we reach the shelter at
Black Gap. We are happy to be done with the trail and its dangerous conditions
for the day. This shelter is a three sided structure with a small overhang. Not
one of the fancier huts but it will provide us with a place to set up the tent out
of the bone-chilling wind. Michael heads down a steep slope to a ground spring
to fill the water bottles while I start pulling the tent and fly from our packs.
I haven't felt my toes or finger tips since the top of Springer and all I can
think about is crawling into my down bag inside the tent. Michael returns with
the water just as I am getting the fly fastened on the tent. He quickly assembles
the stove and begins boiling water while I unroll our sleeping pads and pull
the sleeping bags out of their stuff sacks, shaking them out to get loft in the
down. The tent is ready just as I start to shake with cold. I remove my boots
and crawl fully clothed into my sleeping bag.

I usually do the cooking
when we are on the trail but tonight I am totally spent. I have put myself in Michael’s able
hands. Lucky for me, he is a veteran
camper, hiker and international mountain climber. This weather doesn't faze him one bit. He is trained in search and rescue and basic
wilderness first aid and has helped fellow hikers avoid hypothermia in the past.
I take comfort in the fact that he is in
control. Within minutes he hands me a
steaming cup of miso soup and turns back to boil more water to cook the noodles
for Pad Thai. He expertly adds the dehydrated veggies I prepared at home, before
he drops the pouch of Pad Thai sauce into the water to heat. In record time I'm
eating a hot delicious meal and beginning to regain feeling in my extremities.
We finish eating and Michael makes a second trip to get more water. We will
need it in the morning for breakfast but more importantly, it will keep us from
freezing tonight. He boils a second pot of water and carefully divides the
steaming water between our two Nalgene bottles. Soon we are both cocooned in
our bags soaking up the heat from our makeshift hot water bottles. For a
special treat I serve us both a square of dark chocolate with sea salt which we
savor as we listen to the roaring of the winds in the trees above.

Morning
is sunny but still very cold. I would rather stay in the warmth of my sleeping
bag but I have no choice but to get up.
My refusal to venture out to the privy in the freezing wind last night
has made a visit first thing this morning critical. Michael starts to boil water for coffee and
then heads out to see if he can find any animal tracks while the stove does its
work. I find that I am not the first to
visit the privy since the snow stopped. A single set of fox prints leads the
way and back. Michael locates coyote
tracks about 5 yards from the shelter.
It is evident that we were not alone last night. We both return to the shelter to enjoy our
morning coffee. I have to make up for
abandoning my cooking duties last night and start mixing the batter for sweet
potato pancakes. Thirty minutes later we
have eaten and packed up. Even though
the sun is shining, the temperature is still in the twenties and I am eager to
get moving to warm myself up. As we walk
up the path from the shelter to the trail, the aurorean light is quickly
erasing all thoughts of last night’s discomfort. The landscape is pristine white and a lone
bird sounds off as we start to climb the gentle slope up Black Mountain. As we reach the crest of the first rise I
have to catch my breath. Last night’s
storm has transformed the forest into a magical land of cut crystal. Every tree, bush, and strand of grass is
coated in ice. The effect is almost
blinding as the morning sun sparkles and reflects off the branches and
leaves. Looking up, the trees appear to
have diamonds hanging in clusters from their branches. We hike slowly. I have my camera out and I’m trying to take
photos of everything knowing full well that modern technology is incapable of
capturing the full scope of this experience.
That storm last night was not so bad after all, I think to myself.


Slowly
the enchantment of the mountain top fades as we descend into Nimblewill Gap. Within a short distance the snow has totally faded
away and the warm sun has melted the ice.
We pass a couple out on day hike, who tell us that the Len Foote Hike
Inn gives hot coffee to hikers who stop there.
The thought of a warm room and hot brewed coffee makes the decision to
detour over to the inn an easy one for us.
By 11:30 am we are sitting in the Hike Inn family-style dining hall with
a number of other hikers, enjoying not only hot coffee but vegetable soup and
desserts left over from the previous night. The food and drink are free, though
we generously add to the donation box as we leave. Feeling happy and full we pause in the inn’s
reception area to sit on a comfy sofa and look at the antique hiking equipment
on the walls. A large synthetic stuffed
black bear wearing a Hike Inn employee t-shirt watches Michael thumb through an
informational booklet. Eager now for the
comfort of our room at the lodge, we head out and don our packs once
again. The Hike Inn is 5.5 miles from
the Lodge at Amacolola Falls and all I can think about is a long hot soak in
the tub. The path between the Hike Inn
and the Lodge is popular and we pass many people out for day hikes or heading
to the inn to spend the night. It’s almost
2:00 pm when we emerge from the woods onto the paved road that leads up to the
Amacolola Falls Lodge and within minutes it comes into view. The sight of hikers in full gear plodding
into the beautiful lobby is not uncommon; however we are the only ones around
today. As we check-in, the clerk asks if
we would like a cart for our packs.
Michael and I smile at each other as we decline. Another few yards hiking won’t hurt us and I
can already hear that bathtub filling.
THE
END

Subscribe to:
Posts (Atom)